Are you unsure about how many roof trusses you need for your project? Many people get lost in complex measurements and technical details. This confusion can lead to expensive errors, delays, and even problems with your roof’s structure.
I’m here to guide you through this. My detailed guide will show you how to figure out the number of trusses needed. We’ll use easy methods and a reliable measuring tool. By learning about roof truss basics, you’ll be able to plan your project well and have a strong, dependable roof.
Understanding Roof Truss Basics and Their Importance
Roof trusses are the backbone of any sturdy building structure. They provide critical support and stability to your roof. These triangular frameworks are designed to distribute weight efficiently. They create a reliable overhead shield for your home.
Let’s dive into the essential components that make roof truss design so critical for residential construction:
Read also: What is the Spacing for Roof Trusses
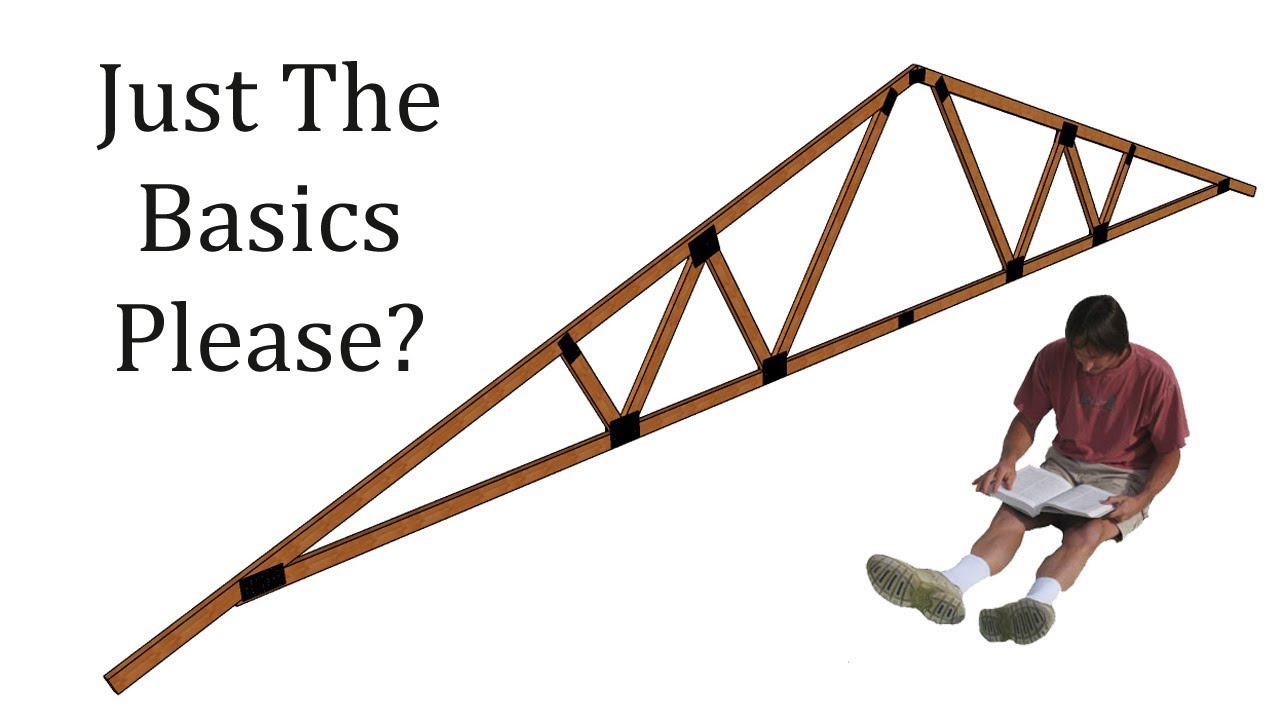
Key Components of a Roof Truss System
- Top chords: Primary load-bearing members that form the roof’s slope
- Bottom chord: Horizontal member creating the ceiling line
- Web members: Diagonal supports connecting top and bottom chords
- Connector plates: Metal fasteners ensuring structural integrity
Why Proper Truss Planning Matters
Effective truss load capacity determines the overall strength and durability of your roof. Improper design can lead to structural failures. This can compromise your entire building’s safety. Professional planning ensures:
- Optimal weight distribution
- Resistance to environmental stresses
- Long-term structural reliability
Common Truss Types for Residential Buildings
| Truss Type | Typical Span | Best Used For |
|---|---|---|
| King Post | 16-26 feet | Small to medium residential roofs |
| Queen Post | 26-39 feet | Larger residential structures |
| Attic | Up to 82 feet | Creating additional living space |
| Scissor | Up to 72 feet | Vaulted ceiling designs |
Understanding these truss basics will help you make informed decisions about your roof’s structural design. This ensures a safe, reliable home for years to come.
Essential Measurements for Truss Calculations
To figure out how many roof trusses you need, start with accurate measurements. I’ll show you the important dimensions for your roof truss needs. Knowing these measurements will make planning your roof project easier.
When dealing with roof truss span, focus on a few key measurements:
- Roof length
- Roof width
- Roof pitch
- On-center spacing
The formula for finding truss count is simple: truss count = ((roof length × 12)/24) + 1. For instance, a 30-foot roof usually needs 16 trusses, and a 40-foot roof requires 21 trusses. The usual on-center spacing is 24 inches, but 12 and 16-inch spacings are used for specific structural needs.
Roof span tables are key for finding the right truss setup. They show how roof sizes affect truss placement and count. Make sure to pay attention to the roof width, as it affects the number and spacing of trusses needed.
Pro tip: Always double-check your measurements and calculations. Small mistakes can cause big problems during installation. Use a reliable tape measure and consider a professional if you’re unsure about your calculations.
How Many Trusses Do I Need: A Complete Guide
Finding the right number of trusses for your roof can seem hard. But, I’ll guide you through it step by step. Knowing what your roof needs is key for a good build.

When you use a truss span calculator, focus on a few important things. The basic formula for figuring out truss count is simple: ((roof length × 12) / 24) + 1. This means for every 24 inches of roof, you need one truss. Plus, you need an extra truss for the edge.
Basic Formula for Truss Count
Let’s look at a simple example. For an 8-12 feet roof section, follow these steps:
- Measure your total roof length
- Divide the length by 24 inches
- Add one extra truss for the edge
Factors Affecting Truss Spacing
Several important factors affect truss spacing and count:
- Roof pitch (standard range is 3:12 to 12:12)
- Roofing material weight
- Local building codes
- Snow and wind load requirements
Calculating Total Roof Length Requirements
To figure out your exact truss needs, talk to local building experts. They can help with your area’s specific needs. They’ll make sure your roof is safe and meets all standards.
Pro tip: Standard roof truss spacing is usually 24 inches on center. For heavy roofing like clay tiles, you might need to space them 16-20 inches apart for better support.
Understanding Truss Spacing and On-Center Measurements
Truss spacing is key in roof design. It affects the roof’s strength and how well it works. Knowing on-center measurements is important for support and following building codes.

The usual roof truss spacing for homes is 24 inches on center. This means the space between the trusses’ centers. But, different roofing materials might need different spacing.
Standard On-Center Spacing Options
Truss spacing can be from 2 to 10 feet on center. Some common options are:
- 24 inches (2 feet) on center: More support points
- 4 feet on center: More bracing and connection points
- 8 feet on center: Common in the Midwest
Impact of Building Code Compliance on Spacing
Building codes are very important for truss spacing. Different roofing materials need different spacings for support. For example:
- Asphalt shingles usually need 24-inch spacing
- Clay or concrete tiles might need 16-20 inch spacing
- Slate roofing might need as little as 12 inches on center
Always check local building codes and talk to a pro when planning your roof. This ensures your truss spacing is safe and meets structural needs.
Read also: Pros and Cons of Synthetic Slate Roofing
Calculating Rafter Length and Roof Pitch

Knowing how to figure out roof truss span and rafter length is vital for your roofing project. Roof pitches usually range from 4:12 to 9:12. Most homes have roofs with common ratios like 6:12 and 8:12. Let’s go over the steps to find your roof’s exact measurements.
To calculate rafter length, you need two formulas, depending on your roof type:
- Rafter length based on rise: rafter length = √(rise² + run²)
- Rafter length based on pitch: rafter length = run × √(pitch² + 1)
When using a truss span calculator, you’ll need to input three important measurements:
- Roof pitch (expressed as X in 12)
- Horizontal run
- Vertical rise
Pro tip: For a 12-foot span with a 4:12 pitch, the rafter length is about 6 feet 4 inches. Keep in mind, this length is for the rafter’s line length. It might be different from the total length because of overhangs.
| Pitch Ratio | Vertical Rise | Approximate Rafter Length |
|---|---|---|
| 4:12 | 4 inches per 12 inches | 6 feet 4 inches |
| 6:12 | 6 inches per 12 inches | 7 feet 2 inches |
| 8:12 | 8 inches per 12 inches | 8 feet 1 inch |
When figuring out your roof truss span, being precise is important. Use tools like a Speed Square to mark angles accurately. This helps make sure your roof is strong and safe.
Cost Considerations for Roof Truss Installation
Planning a roof truss installation needs careful budgeting. Knowing the costs helps you make smart choices and keep your project affordable.
Material Cost Variables
Material costs are key when planning a truss installation. The price of roof truss design varies based on several factors:
- Timber trusses range from $3-$5 per board foot
- Steel trusses cost $7-$9 per board foot
- Different truss types impact overall expenses
Labor and Installation Expenses
Labor costs can greatly affect your budget. Professional installation costs $20-$75 per hour. For a 2,000-square-foot house, the total cost could be $7,500 to $12,000.
Additional Equipment Requirements
You’ll also need to budget for extra equipment:
- Crane rental: $200-$700 per day
- Scaffolding rental: $15-$50 per day
- Waste removal: $50-$75 hourly rate
By planning your roof truss design and understanding costs, you can have a successful and affordable installation.
Building Code Compliance and Manufacturer Specifications
Understanding building code compliance can be tough. As a contractor or homeowner, knowing the rules for truss design and installation is key. It ensures safety and helps avoid legal problems.
The International Residential Code (IRC) and Truss Plate Institute (TPI) standards are vital. They give clear guidelines for truss design, spacing, and installation. These rules must be followed carefully.
- Trusses must meet specific spacing requirements
- Proper bracing is mandatory for structural integrity
- Manufacturer recommendations must be strictly followed
- Documentation must be prepared for building inspections
Truss manufacturer recommendations are critical for safety. Each truss has detailed drawings that show:
- Overall building width
- Maximum span limitations
- Required bracing techniques
- Load-bearing specifications
Important compliance points include a roof slope of 3:12 to 12:12. Also, trusses must resist winds up to 140 miles per hour. For spans over 60 feet, special inspections are needed, showing the need for expert checks.
I suggest working with a Registered Design Professional. They can check if your truss design meets local codes and manufacturer specs. This way, you can avoid costly errors and ensure a safe roof.
Common Mistakes to Avoid in Truss Planning
Roof structure engineering needs precision and careful detail. Both pros and DIY folks face challenges in truss planning and installation. These can harm a building’s structure.
Knowing common mistakes can save time and money. It also prevents serious structural problems. I’ll talk about common measurement errors and installation challenges that affect truss load capacity.
Measurement Errors and Solutions
Getting measurements right is key in roof truss engineering. Studies show about 40% of truss installation mistakes come from wrong measurements. Here are ways to avoid errors:
- Use high-precision measuring tools
- Double-check all measurements before cutting
- Implement real-time team communication during measurement checks
- Create detailed measurement documentation
Installation Pitfalls to Watch For
Truss installation needs careful attention. Important things to remember include:
- Ensuring proper connector plate sizing
- Maintaining correct alignment during installation
- Following manufacturer’s storage and handling guidelines
- Using appropriate personal protective equipment
By following these tips, you can cut installation errors by up to 35%. This improves roof structure engineering results.
| Error Type | Potential Impact | Prevention Strategy |
|---|---|---|
| Measurement Inaccuracy | 25% increased error rate | Use precise measurement tools |
| Incorrect Connector Plates | 15% increased truss bowing | Follow manufacturer specifications |
| Improper Storage | 20% reduced material longevity | Store materials according to guidelines |
Professional expertise and careful planning are the best ways to avoid truss installation problems.
Conclusion
Knowing how many trusses you need is key for a good roofing project. I’ve covered the basics of roof truss design, from measuring to cost. Most homes need between 20 and 40 trusses for support, depending on the building.
Choosing the right materials is important for your roof truss installation. Timber trusses are a cost-effective option, priced between 200 to 700 USD per truss. They can span up to 8 meters and are strong due to their shape.
Remember, planning is everything. Whether it’s a home or business, getting help from an architect or engineer is wise. They can design the best roof truss for your needs. By focusing on span, load, and local codes, you’ll get a strong roof that lasts.
Your roof is more than just a cover—it’s a key part of your building. With the right number of trusses, you’ll get a safe, efficient, and lasting roof. It will meet your needs and look good too.


