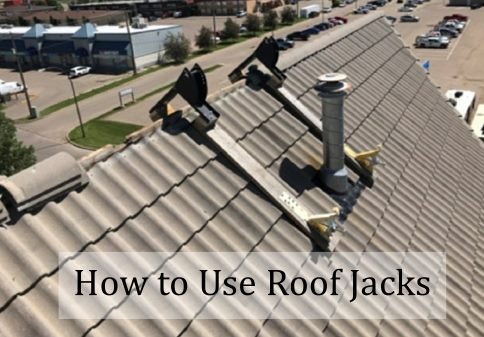
Roof jacks are the safety tools commonly found on different roofing tasks. They are created based on a metallic hook curve at one end and a J-shaped curve at the other. By using this tool, you’d be able to connect shingles to large planks or boards.
From personal experience, working on roofs during cold or wet conditions without roof jacks significantly increases the risk of slips and falls. Roof jacks provide the necessary stability, especially when working on metal roofs, which are notoriously slippery under these conditions.
This placement allows you to stand and move safely and effectively in the roof area. However, it can be challenging to use if your roof is made to be fixed with sturdy shingles. Roof jacks help distribute weight evenly across the roof, reducing the risk of damage to shingles or tiles, especially on steeper roofs.
So, how do you use roof jacks properly? Please read the following passage to learn more.
How to use Roof Jacks on Existing Roof
Roof jacks are easy to set up and remove, so they are ideal for various projects. Here is the list of steps on how to use it to get it installed and working properly while you work:

Attach the jack
Roof jacks make it easier to set roofing and increase safety by providing a stable surface. Ideally, you should find the rafter first underneath the sheathing (locate by feeling the nails). Then, attach the tool to the rafter by driving a couple of 16d nails.
When attaching roof jacks, using multiple nails (preferably all available slots) is crucial to ensure the jack is securely fastened. In my experience, using all three nail slots, as opposed to just one, significantly improves stability and safety.
Set the plank firmly
Find a board in any size (typically 2 x 8” or 2 x 10”) and slip it into the jacks. Make sure the plank extends the jacks on each side by 6”. Set the plank securely to prevent the board from tipping over.
Release the jack
When you are done, you must remove the jack. To do so, use a hammer to disengage the nails from the jack. Drive the nails so that they do not poke your roofing, slip the pry bar over the nail head and below the shingle, and pound it down. Alternatively, you may lift the nail if the tab is already flexible.
Roof Jacks for Metal Roofs
If there is a significant downside to using a metal roof, it is the safety aspect when you need to get over it. Metal is slippery, especially when it gets wet or covered with snow.
Given the slippery nature of metal roofs, especially in wet conditions, roof jacks are indispensable for providing a secure work surface. Even slight moisture can make metal roofs extremely dangerous, so proper use of roof jacks cannot be overstated.
Avoid climbing on the roof when it is in either of these conditions. Some areas that experience heavy snow during winter even consider avalanche snow from the metal roof a definite hazard.

Another circumstance when you need roof jacks is when the roof has an extremely steep angle. This tool can help you gain a better foothold when inserting new shingles or fixing the damage. You may opt for metal or plastic roof jacks, depending on the roofing material.
While metal roof jacks are more durable, plastic roof jacks are easier to install and cost-effective, particularly for smaller, less demanding projects.
Shingling is a very exhausting job that can be dangerous. Acquire as many roof jacks as you need, depending on the length and steepness of your roof.
If the area is easy to walk on, two or three roof jacks will be enough for rough measurement. To prevent slipping down, install this equipment and the board as instructed on how to use the roof jacks above.
| Step | Description |
|---|---|
| 1 | Prepare the materials, including roof jacks, nails, and hammer. |
| 2 | Measure and mark positions, ensuring spacing of 6-8 feet. |
| 3 | Attach the roof jacks securely using 10d to 16d nails. |
| 4 | Avoid interfering with shingle joints during installation. |
| 5 | Secure roofing materials to the jacks for a stable working platform. |


