Do you have a roof that’s no longer up to your home’s needs? Many homeowners struggle with roofs that are outdated or don’t offer enough protection. Worrying about leaks, energy waste, and lower property value can be stressful.
Extending a hip roof is a smart way to solve these issues. My guide will show you how to improve your home’s roof. You’ll learn how to boost your property’s value, save on energy, and make your home more weather-resistant.
This guide will give you the knowledge to extend a hip roof confidently. You’ll learn about design basics and how to successfully complete your project. I’ll share professional tips to ensure your roof looks great and works well.
Read also: How to Build a Gable Porch Roof
Understanding Hip Roof Basics and Their Design Features
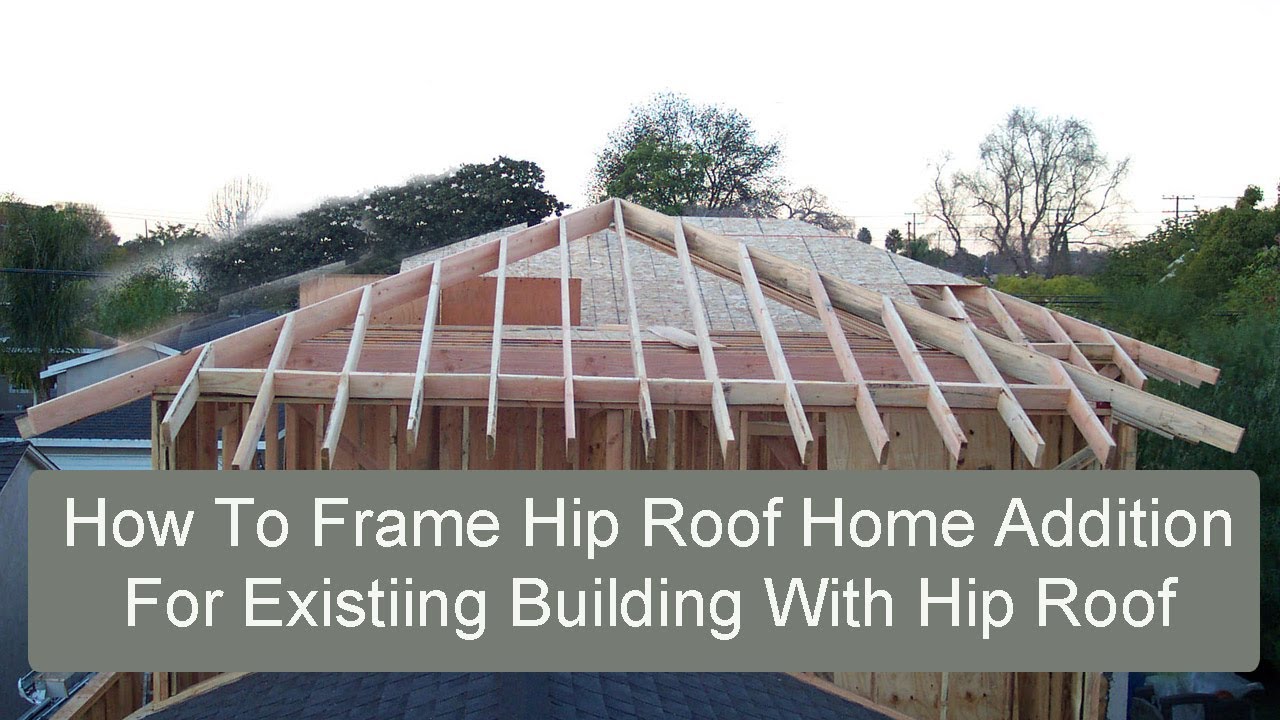
Hip roofs are a standout in roof design, known for their unique shape. They have slopes on all four sides, resembling a pyramid. Knowing about hip roof framing is key for homeowners or those interested in construction.
- Simple Hip Roof: The most basic design with four equal-length sides
- Half-Hip Roof: Features two shorter sides with a small gable at the top
- Cross-Hip Roof: Two hip roofs intersecting at a right angle
- Pyramid Hip Roof: A square base with sides meeting at a single point
Key Structural Components
The beauty of hip roof framing is in its complex yet elegant design. Key parts include:
- Ridge Boards: The horizontal beam at the roof’s peak
- Hip Rafters: Diagonal rafters that run from the roof’s corners to the ridge
- Common Rafters: Vertical supports that extend from the wall plate to the ridge
Advantages of Hip Roof Design
Many homeowners choose hip roofs for good reasons. They offer great wind resistance, efficient water drainage, and strong structure. The inward slope helps distribute weight, reducing damage risk in bad weather. Plus, hip roofs look sleek and fit many architectural styles.
Planning Your Hip Roof Extension Project
Starting a hip roof addition needs careful planning and smart thinking. Before you begin, it’s wise to plan thoroughly. Knowing about roof extension costs helps you set a budget and avoid surprises.
Important things to think about for your hip roof extension include:
- Checking if your roof can handle the extra weight
- Figuring out exactly what you want to add
- Thinking about how it might affect your home’s structure
- Looking at how it might increase your home’s value
Roofing experts say it’s key to check your roof’s structure first. Many people find that adding a loft can boost their home’s value by 20%. The cost of adding a hip roof can vary a lot, from $10,000 to $30,000. This depends on how complex it is and the materials used.
Things you should really think about include:
- Getting the right building permits
- Talking to structural engineers
- Creating a detailed plan for your project
- Setting aside money for any surprises
From my experience, careful planning stops expensive mistakes. A hip roof addition needs precision and a deep understanding of your home’s structure. By spending time on detailed planning, you’ll lay a strong foundation for a successful project.
Essential Tools and Materials for Extending a Hip Roof
When you’re ready to extend a hip roof, picking the right materials and tools is key. I’ve learned that getting ready well can make a big difference. It can turn a tough renovation into a smooth one.

Required Construction Equipment
- Roofing nail gun (can speed up installation tenfold compared to traditional hammering)
- Specialized roofing knives for precise cutting
- Measuring tape and level
- Circular saw
- Safety ladder
- Power drill
Building Materials Checklist
When picking materials for your roof extension, remember these:
- Plywood or OSB sheathing (structural substrate)
- Roofing shingles (order approximately 10% extra for waste)
- Roof leak barriers
- Flashing materials
- Starter strip shingles
- Wooden trusses or framing lumber
Safety Equipment Requirements
Safety is always first when working on a hip roof extension. Make sure to get:
- Hard hat
- Non-slip work boots
- Safety harness
- Protective eyewear
- Work gloves
- Respirator mask
Pro tip: Think about using aerial roof measurement services like GAF QuickMeasure. They help you get the exact materials you need for your project.
Calculating Roof Measurements and Angles
Getting the roof slope right is key for hip roof remodeling. Knowing the exact measurements and angles is vital for a successful project. I’ll show you the important calculations for a sturdy roof extension.

For hip roof remodeling, certain measurements are essential. Let’s look at the main calculations you need to know:
Ridge Board Length Calculations
Figuring out the ridge board length is important. Here’s how to do it:
- Measure the building’s total width
- Subtract the building’s length from the width
- The result is your ridge board length
For example, a 25 ft wide, 40 ft long building has a 15 ft ridge board. This exact measurement is key for roof slope calculations.
Rafter Angle Determinations
Getting the rafter angles right is critical for hip roof remodeling. Here’s what to do:
- Set saw bevel angle to 45° for hip and creeper side angles
- Use a digital angle finder for maximum precision
- Remember to account for rafter thickness in calculations
Hip Rafter Measurements
Calculating hip rafter measurements needs some special math. The hip rafter run is found by multiplying the distance to the nearest king common by the square root of 2 (1.414). This keeps your roof’s geometry correct during remodeling.
Pro tip: Always use a story stick for initial measurements to avoid errors. Metric tape measures can also help, making calculations easier with fractional numbers.
Extending a Hip Roof: Step-by-Step Process

Extending a hip roof needs careful planning and precise steps. I’ve learned that paying attention to details is key for success. Hip roofs are complex, so a step-by-step approach is essential.
Before starting, make sure you have these tools:
- Measuring tape
- Circular saw
- Hammer
- Level
- Framing square
The steps to extend a hip roof are important. First, remove the old roofing to see the framework. Use pre-cut common rafters as guides.
- Measure the existing ridge board length
- Secure temporary support structures
- Cut new rafters to match existing pitch
- Position ridge board at correct elevation
- Nail common rafters into ridge board
When adding to hip roof sections, remember hip rafters are thicker. Use 2×10 lumber for hip rafters and 2×6 for common ones. Make sure hip rafters are at a 45-degree angle for strength.
Adding roof structure also means ensuring loads are evenly distributed. Modern roofs might need extra support beams, which are important in bad weather.
Read also: Paint to Stop Condensation on Metal Roof
By following these steps carefully, you’ll get a strong hip roof extension. It will make your home stronger and look better.
Installing Support Structures and Framing
When you extend a hip roof, building a strong support structure is key. The design of roof trusses is vital for your roof to handle different weather conditions. I’ll show you how to install support structures that keep your home safe and provide reliable shelter.
The success of a roof extension starts with the right beam placement and truss installation. Adding roof structure needs careful planning and attention to detail. Here are the main steps for building a strong framework:
Beam Placement Guidelines
Proper beam placement is essential for distributing loads evenly. Here are some important guidelines:
- Make sure beams support the whole roof span
- Choose engineered wood products for strength
- Keep a 50mm gap between hip rafters
- Think about wind speed and local building codes
Truss Installation Methods
There are several ways to install trusses:
- Prefabricated trusses save time and money
- Building rafters on-site lets you customize
- Engineered truss systems ensure even load distribution
Framework Reinforcement Techniques
Strengthening your roof framework is important for its long-term durability. Key techniques include:
- Use construction adhesive for strong connections
- Install temporary braces during building
- Add collar ties for extra support
- Use gusset plates to strengthen connections
By following these steps, you’ll build a strong roof structure that will protect your home for many years. Remember, precision and careful planning are essential for a successful roof extension project.
Roofing Material Selection and Installation
Choosing the right roof materials is key for a great hip roof remodel. The roof’s look and how long it lasts depend on what you pick.
When picking roof materials, consider these important options:
- Asphalt shingles: Most affordable and widely used
- Metal roofing: Extremely durable and energy-efficient
- Cedar shingles: Natural look with excellent insulation properties
- Clay or concrete tiles: Premium option with superior longevity
Understanding what each material offers is vital for a successful remodel. Asphalt shingles last 20-30 years and cost $3-$5 per square foot. Metal roofing, on the other hand, can last up to 50 years and is great for wind resistance.
Here are some tips for installing your roof materials:
- Ensure proper substrate preparation
- Use high-quality underlayment
- Maintain recommended overlap between roofing components
- Follow manufacturer’s specific installation guidelines
Cedar shingles need special care during installation. They work best on steep roofs and need good ventilation to avoid moisture damage. Make sure to leave enough space between shingles for expansion and contraction.
It’s important to match your new roof with the old one for a smooth look. Talk to a professional roofer to find the best materials for your climate and style.
Ensuring Proper Drainage and Ventilation
Creating a good drainage and ventilation system is key for your hip roof extension’s life. My roofing experience shows that roof slope and support are vital for a healthy roof.
When designing your roof’s drainage system, consider these important elements:
- Gutter placement and sizing
- Downspout positioning
- Water runoff management
- Ventilation requirements
Gutter System Integration
Proper gutter installation stops water damage and protects your home’s foundation. Experts say downspouts should be at least 2 metres from the building to avoid water pooling.
| Gutter Material | Durability | Corrosion Resistance |
|---|---|---|
| Aluminum | High | Excellent |
| Steel | Medium | Good |
| Vinyl | Low | Limited |
Ventilation Requirements
Roof ventilation is key to prevent moisture buildup and keep energy costs low. A balanced system includes intake and exhaust vents. These help control attic temperature and humidity.
- Install ridge vents for exhaust
- Use soffit vents for intake
- Consider attic fans for better air flow
By using these drainage and ventilation tips, you’ll keep your hip roof extension safe and working well for many years.
Read also: Roof Ridge Vent Pros Cons
Conclusion
Exploring hip roof additions shows us that success comes from careful planning and precise execution. A hip roof addition is more than just building. It changes your home’s look and function.
Experts say knowing local building rules and material choices is key. Hip roofs are strong on all sides, boosting your home’s value and looks. They also save energy and improve water flow.
Think of a hip roof extension as a smart investment. Team up with skilled pros who get roof building needs. They can help you add space or make your home weather-tight, adding lasting value.
Every home upgrade begins with knowledge, prep, and a clear plan. Your roof extension project might seem tough, but with the right help, it can transform your space beautifully and functionally.


