Are you tired of constantly repairing your aging shingle roof? Traditional roofing systems deteriorate quickly. This leaves homeowners frustrated and financially drained. Leaks, damage, and frequent maintenance can turn your roof into a constant source of stress and unexpected expenses.
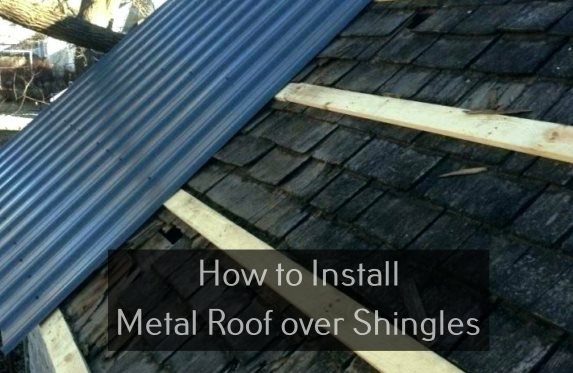
Imagine a roofing solution that eliminates these headaches. Metal roof installation over existing shingles using furring strips offers a game-changing approach. In this guide, I’ll reveal how you can transform your roof. This will extend its lifespan, improve home protection, and save money with a straightforward method.
Get ready to discover a practical, cost-effective roofing strategy. It will revolutionize your home’s protection and aesthetic appeal.
Benefits of Installing Metal Roofing Over Existing Shingles
Upgrading your roof with metal roofing over shingles offers many benefits. It can greatly improve your home’s protection and performance. This method is gaining popularity among homeowners looking to enhance their roof’s durability.
Extended Roof Lifespan and Durability
Metal roofing is a top choice for long-term protection. It lasts up to 50 years, much longer than asphalt shingles which last 15-20 years. It also withstands harsh weather like heavy snow, intense storms, and strong winds.
- Withstands winds up to 140 mph
- Prevents water penetration
- Resists corrosion and rust
- Maintains structural integrity longer than traditional roofing
Cost Savings from Avoiding Tear-off
Installing metal roofing over shingles saves money by avoiding the need to remove old roofs. This method cuts down on labor costs and waste. It’s a cost-effective option for homeowners on a budget.
| Roofing Method | Average Cost | Labor Time |
|---|---|---|
| Traditional Roof Replacement | $8,500 | 3-5 days |
| Metal Roof Over Existing Shingles | $6,200 | 1-2 days |
Environmental Benefits
Metal roofing is an eco-friendly choice for homeowners. It’s made from recycled materials and is fully recyclable at the end of its life. This reduces waste and supports sustainable building.
- Made from 25-95% recycled content
- Fully recyclable after use
- Reduces carbon footprint
- Improves home energy efficiency
Essential Tools and Materials for Metal Roof Installation
Getting ready for a metal roof installation needs careful planning and the right tools. As a roofing pro, I know success starts with the right tools and materials before you go up on the roof.

For metal roof installation, you’ll need a wide range of tools for a smooth process. My top picks include:
- Measuring tape and chalk line
- Power drill with metal-cutting bits
- Metal snips and cutting tools
- Safety harness and roof jacks
- Level and square
- Screw gun with magnetic bit holder
For installing furring strips, you’ll need specific materials for a solid base. Key items include:
- Pressure-treated wooden furring strips
- Waterproof underlayment
- Roofing screws and fasteners
- Synthetic underlayment or #30 felt
- Sealant and weatherproofing tape
I suggest choosing top-notch barrier products for your metal roof. Good options are synthetic underlayment, #30 felt, or thin foil-faced insulation. These protect against moisture and help your roof last longer.
Professional tip: Spend on quality tools and materials from the start. It might cost more, but the right tools save time and avoid costly errors in your metal roof project.
Preparing Your Existing Shingle Roof for Metal Installation
Before you put a metal roof over shingles, getting your roof ready is key. I’ll show you how to make sure your roof is ready for the upgrade.
Comprehensive Roof Inspection
First, a detailed check of your roof is essential. Look closely at your roof’s structure to spot any problems:
- Check for sagging or uneven roof decking
- Inspect for water damage or rot
- Look for loose or damaged shingles
- Examine roof deck integrity
Surface Cleaning and Preparation
Cleaning your roof is more than just a quick sweep. A deep clean is needed for the best metal roof installation:
- Remove debris and loose materials
- Power wash the existing roof surface
- Repair any visible damage
- Ensure a smooth, clean foundation
Ventilation Considerations
Above Sheathing Ventilation (ASV) is vital for metal roofs. Let’s talk about why good ventilation is important:
| Ventilation Benefit | Impact |
|---|---|
| Moisture Control | Prevents condensation buildup |
| Energy Efficiency | Reduces heating and cooling costs |
| Roof Longevity | Extends overall roof life |
Getting your roof ready is the first step to a successful metal roof installation. Inspect, clean, and fix ventilation issues to build a strong base for your new roof.
Understanding Metal Roof over Shingles Furring Strips
Furring strips are key when putting a metal roof over shingles. They make the roof stable and even. These wooden supports turn an old roof into a strong base for your new metal roof.
Read also: Importance of Metal Roof Furring Strips
These strips do a lot during installation. They create a space between the old roof and the new metal. This space helps in several ways:
- It improves ventilation for the roof.
- It helps manage moisture better.
- It fixes small roof surface issues.
- It makes the roof more energy-efficient.
Wood purlins or sub-girts are often used as furring strips. They are attached to the roof’s structure. This creates a flat surface for the metal panels.
Roofers say it’s important to pick the right furring strips and install them correctly. The right spacing and fastening are key for a lasting roof. Knowing about furring strips helps homeowners make smart choices for their roof.
Read also: How Long Does a Cedar Shake Roof Last?
Proper Furring Strip Installation Techniques
Installing furring strips is key to getting your roof ready for metal roofing. These wooden supports make a vital air gap. This gap is between your old shingles and the new metal panels. It helps with ventilation and stops moisture buildup.
Here are some important tips for installing furring strips. They help make your metal roof stable and last longer:
- Select pressure-treated lumber for maximum durability
- Use #30 felt or synthetic underlayment as a protective barrier
- Maintain consistent furring strip spacing for optimal support
Spacing and Alignment Guidelines
Spacing furring strips correctly is key for metal roofing support. I suggest spacing them 24 inches apart, from the center of each strip. This spacing offers strong support and saves on materials.
Fastening Methods and Requirements
Proper fastening is vital for furring strips. Use screws that won’t rust, made for outdoor use. Make sure each strip is well attached to the roof’s structure. This creates a solid base for your metal panels.
- Use galvanized or stainless steel fasteners
- Predrill holes to prevent wood splitting
- Maintain consistent fastener spacing
By following these furring strip installation tips, you’ll set up a strong base for your metal roof. This ensures your roof will perform well and protect your home for years.
Installing Underlayment and Moisture Barriers
Protecting your roof’s foundation is key for a long-lasting roof. The underlayment acts as a barrier between your old shingles and the new metal roof. It prevents water damage and keeps your roof strong.

Choosing the right moisture barrier is important. Different underlayments offer different levels of protection. The right choice can greatly improve your roof’s performance.
- Synthetic underlayment provides superior water resistance
- Felt paper offers traditional protection for budget-conscious projects
- Specialized rubberized membranes work best in extreme climate conditions
Installing the underlayment needs careful attention. Each layer must be placed correctly to form a water-resistant shield. This shield protects your home from moisture.
| Underlayment Type | Water Resistance | Cost | Durability |
|---|---|---|---|
| Synthetic | Excellent | High | 20-30 years |
| Felt Paper | Good | Low | 10-15 years |
| Rubberized Membrane | Superior | Medium-High | 25-35 years |
Begin installing the underlayment at the roof’s lowest point and work up. Make sure each section overlaps by at least 4 inches. This creates a strong water-blocking system that supports your metal roofing guide principles.
Metal Panel Selection and Preparation
Choosing the right metal roofing panels is key. Your selection affects your roof’s performance, durability, and look. As a roofing expert, I’ll help you pick the best panels.
Types of Metal Roofing Panels
There are many panel types for different styles and needs. Here are a few common ones:
- Standing Seam Panels: Great for modern homes
- Corrugated Panels: Best for farms and industrial sites
- Ribbed Panels: Good for homes and businesses
Panel Measurements and Cutting Techniques
Getting your measurements right is essential. Use a top-notch measuring tape and mark panels before cutting. Each panel system has its own way of installation:
- Symmetrical panels can be installed in any order
- Asymmetrical panels need a specific sequence
For cutting panels, use metal shears or a circular saw with a metal blade. Always wear safety gear and work in a well-ventilated area.
Metal Panel Installation Process

Metal roof installation needs precision and careful detail. When putting metal over shingles, placing panels right is key. Steel panels show every flaw under them, so a smooth surface is essential for a pro look.
Before starting, I organize my tools and plan out the steps. The process has several important steps to make a roof that’s watertight and strong.
- Start at the bottom edge of the roof
- Align panels carefully with chalk lines
- Use specialized metal roofing fasteners
- Overlap panels according to manufacturer specifications
- Ensure proper sealing at each connection point
When installing over shingles, panel attachment needs extra care. I suggest using furring strips for an even surface. This helps avoid showing roof flaws.
| Installation Step | Key Considerations |
|---|---|
| Panel Alignment | Use laser level for precise positioning |
| Fastening | Use rubber-washer screws every 24 inches |
| Sealing | Apply weatherproof sealant at overlap points |
Safety is always first when installing metal roofs. I always use the right fall protection gear. Working with a partner helps manage big panels safely.
Flashing and Trim Installation Guidelines
Installing a metal roof right is key to keeping your home dry. My guide will show you how to do it like a pro. You’ll learn the best ways to seal your roof and prevent water damage.
Flashing is your roof’s first line of defense against water. I’ve seen how important it is to install it correctly. It can mean the difference between a roof that lasts and one that doesn’t.
Valley and Ridge Flashing Techniques
Valley flashing needs a lot of care. Here’s how to do it right:
- Measure the valley area precisely
- Cut flashing material with clean, straight edges
- Ensure a minimum 4-inch overlap at seams
- Use high-quality sealant at all connection points
Eave and Rake Trim Installation
Installing eave and rake trim right keeps your roof safe from wind and water. My tips include:
- Align trim pieces carefully
- Use corrosion-resistant fasteners
- Maintain consistent spacing
- Seal all possible entry points
By following these steps, you’ll get a strong, weather-tight roof. It will look great and keep your home safe for many years.
Maintenance Tips for Your New Metal Roof

Keeping your metal roof in top shape is key. Metal roofs last a long time, but regular care makes them last even longer. Even though the initial cost is high, the right maintenance can make your roof last for decades.
It’s important to check your metal roof often. I suggest doing a full check at least twice a year and after big weather events. Look for these signs:
- Loose or damaged fasteners
- Signs of corrosion
- Scratches or paint damage
- Debris accumulation
Cleaning your metal roof is also vital. It keeps the coating and look in good shape. Use gentle cleaning methods to avoid damage:
- Use soft-bristled brushes
- Employ mild, non-abrasive detergents
- Rinse thoroughly with water
- Avoid high-pressure washing
Regular maintenance can save you money in the long run. Here’s a quick guide to keep your roof in shape:
| Frequency | Maintenance Task |
|---|---|
| Bi-Annual | Complete roof inspection |
| Annually | Professional roof assessment |
| As Needed | Remove debris and clean surface |
By sticking to these maintenance tips, you’ll make your metal roof last for many years. And you’ll keep your home safe and sound.
Conclusion
Installing a metal roof over shingles furring strips is a smart choice for your home. It boosts your property’s protection and value. I’ve shown you how to overlay a shingles roof with metal panels, covering all the important steps.
This roofing choice offers more than just looks. It makes your home last longer, saves energy, and cuts down on costs over time. Using furring strips is key for ventilation, helping your metal roof stay dry and strong.
Read also: How to Apply Paint for Galvanized Metal Roof Properly
Plan carefully and pay attention to detail for a successful metal roof installation. Good preparation, precise installation, and regular upkeep are essential. This way, your roof will protect your home for many years.
While you can try to install it yourself, getting help from roofing experts is wise. They can make sure your roof meets all the necessary standards. Investing in quality materials and proper installation will make your roof last longer and keep your home safe.


