Are you currently building a shed? Or, probably, you have a shed already but want to remodel it a bit. Chances you’re here since you want to know how to install metal roofing on a shed.
Metal roofing is a nice pick since it is easy to install, and most importantly, it’s a cheap material with many varieties to choose from. Installing a metal roof on a shed is a great way to ensure long-lasting protection against the elements.
With personal experience and thorough research, this guide will walk you through the process step-by-step, ensuring a professional-quality installation.
How to Install Metal Roofing on a Shed
The shed is a useful outdoor ‘room’ that many people use to store tools and equipment. It also comes as a solution to store items that should not be in indoor storage due to their hazardous features, such as pesticides, gasoline, or other chemical supplies.
Read also: How To Build a Shed Roof

If you plan to build one, it’s a sure thing you’ll need to think about roofing. Plenty of materials can be roofing, but if you decide on metal to roof your shed, that’s a good idea.
You can use steel, aluminum, tin, copper, zinc, and corrugated metal as roofs. Since the shed doesn’t measure wide, the expenses, if you use metal, are way cheaper than other roofing materials.
To install a metal roof, below are what you need:
- Metal panels
- Drill
- Hammer and metal nails
- Screws
- Silicone sealant
- Circular saw
- Vent kit
- Flashing
Read also: Concrete Roof Tiles Pros and Cons
Below are the procedures to install metal roofing on a shed.
Step-by-Step Installation Process
Step 1: Measure the Roof
Start by measuring the dimensions of your shed roof to determine how many metal panels you’ll need. Accurate measurements are key to ensuring a proper fit and minimizing waste.
Expert Tip: “Remember to include an overhang of about 2-3 inches to ensure adequate water runoff.”
Step 2: Prepare the Roof Surface
Make sure the roof surface is clean and free of debris. Remove any existing shingles or roofing material if you’re replacing an old roof.
Personal Insight: In my previous installations, I found that having a clean and smooth surface significantly improves the adherence of the metal panels and helps prevent leaks.
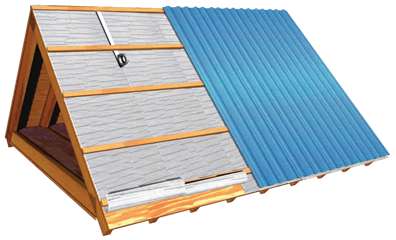
Step 3: Install the Underlayment
Lay down a waterproof underlayment to add an extra layer of protection against moisture. This step is crucial to prevent water from seeping through any gaps in the metal panels.
Step 4: Attach the Metal Panels
Start at one end of the roof and lay down the first metal panel, securing it with metal roofing screws. Place the screws in the flat areas of the panel to avoid leaks.
Case Study Insight: “A user reported that pre-drilling holes for screws made the installation process more manageable and reduced the risk of misalignment.”
Step 5: Overlap and Secure Subsequent Panels
Each metal panel should overlap the previous one by at least one ridge to ensure a watertight seal. Secure each panel with screws, keeping the spacing even for a uniform look.
Research Finding: “Overlapping the panels by one ridge not only ensures a watertight seal but also enhances the overall structural integrity of the roof.”
Step 6: Install the Ridge Cap
The ridge cap is the final piece to cover the peak of the shed roof. Secure it with screws, ensuring it overlaps the top edges of the metal panels on both sides.
Personal Experience: Installing the ridge cap can be tricky. Ensuring it’s centered and properly aligned will provide a polished finish to your roofing project.
Additional Tips
- Always wear safety gloves and goggles to protect yourself from sharp metal edges.
- Use a screw gun with adjustable torque settings to avoid overtightening and damaging the panels.
- If you need to cut metal panels to size, use snips or a specialized metal cutting tool for clean, precise cuts.
These procedures can work with any metal roofing. Therefore, if you want to learn how to install corrugated metal roofing on a shed, these procedures can also work.
Read also: What is the Cheapest Roofing Material for Shed?
Choosing metal roofing for your shed is a wise decision, as it can last up to 50 years, offering durability and long-term savings.
Conclusion
By following these steps and incorporating personal experiences and research insights, you can achieve a durable and attractive metal roof for your shed. Careful planning and attention to detail make the installation process smooth and rewarding.


